Home Improvement How-To's: Taping Joints
|
Joints should always
be reinforced to prevent cracking. This is best done by first applying
a thin layer of compound. Then depending on the type of compound you
are using, press strips of paper or fiberglass wallboard tape into the
damp compound. Use fiberglass tape when you are using a quick setting
compound and paper wallboard tape for regular premixed wallboard
compounds |
||
|
SKILL SCALE Medium
TIME REQUIRED TOOLS MATERIALS |
||
| STEPS | ||
|
|
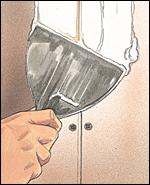 |
Apply a thin layer of wallboard compound over the joint with a 10- or 12-inch wallboard knife. |
|
|
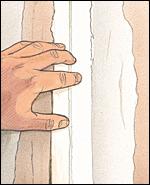 |
Press the wallboard tape into the compound as soon as it is applied. Be sure to center the tape on the joint, then wipe away any excess compound. Smooth the joint with a 6-inch wallboard knife, then allow to dry completely |
|
|
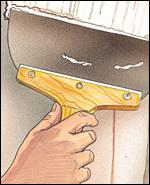 |
Apply another coat of compound, this time with a 10- or 12-inch wallboard knife, and let it dry overnight before applying the final coat. |
|
|
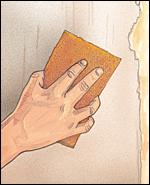 |
Apply the finish coat and sand it until it is smooth. If dust is a problem (and sanding creates a lot of dust), you can close off adjacent rooms with plastic sheeting or you can use a wet sanding sponge. |