Home Improvement How-To's: Installing Recessed Lighting
|
SKILL SCALE Medium TIME
REQUIRED TOOLS
MATERIALS |
||
| STEPS | ||
| 1 |
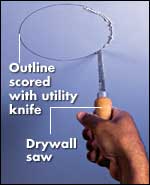 |
OPTION 1 Cut the hole. Lightly mark all light locations. Use a stud finder to make sure they do not overlap a joist. Or, drill a hole and poke a bent wire up into it to make sure the hole is entirely between joists. Use the template provided with the light to draw a circle on the ceiling. Draw and cut each hole precisely. If it is even a little too big, the can may not clamp tightly. Wearing safety glasses, cut the line lightly with a utility knife; then cut along the inside of the knife line with a drywall saw. Take care not to snag any wires that may be in the ceiling cavity. |
| 2 |
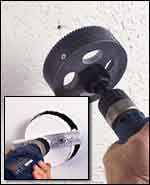 |
OPTION 2 Use a Hole-Cutting Saw. This tool saves time and cuts holes precisely. You don't have to draw the outline of the hole on the ceiling; just mark the center point. Check to see that you will not run into a joist. Check that the lights fit snugly without having to be forced into place. Note: This tool is costly (the saw and the arbor are sold separately), but it's worth the price if you have more than six holes to cut through plaster. A less-expensive tool (inset) is available for cutting through drywall only. |
| 3 |
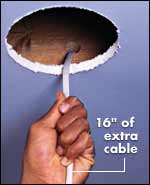 |
Run cable from a power source to a switch box and then to the first hole, allowing at least 16 inches of extra cable to make wiring easy. Work carefully, and use a drill with a long bit to avoid cutting additional access holes that will need patching later. |
| 4 |
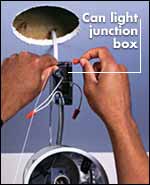 |
Open the light's junction box. Usually, there's a plate that pops off. Run cable into the box, and clamp it. Strip insulation, and make wire splices-black to black, white to white, and ground to ground. Fold the wires into the box, and replace the cover. |
| 5 |
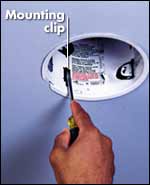 |
Most remodel cans have four clips that clamp the can to the ceiling by pushing down on the top of the drywall or plaster. Pull the clips in so they do not protrude outside the can. Slip the can's box into the hole; then push the can body up into the hole until its flange is tight to the ceiling. With your thumb or a screwdriver, push each clip up and outward until it clicks and clamps the fixture. |
| 6 |
 |
Most trims are mounted with coil springs or squeezable rod springs (as shown). If you have coil springs, hook each spring to its assigned hole inside the can (if it is not already there). Pull out each spring, and hook it to the trim; then carefully guide the trim into position. If you have rod springs, squeeze and insert both ends of each spring into their assigned holes. Push the trim up. |