Home Improvement How-To's: Finishing Inside Wall Corners
|
Inside corners are a
natural place for hairline cracks to appear. This can be prevented by
first applying a thin layer of wallboard compound, followed
immediately by strips of paper or fiberglass wallboard tape pressed
into the damp compound. You will want to use fiberglass tape if you
use a quick-setting compound and paper wallboard tape if you use a
regular premixed wallboard compound. |
||
|
SKILL
SCALE Medium
TIME REQUIRED TOOLS
MATERIALS |
||
| STEPS | ||
|
|
 |
Use a 4-inch wallboard knife to apply a thin layer of premixed wallboard compound to both sides of the inside corner. |
|
|
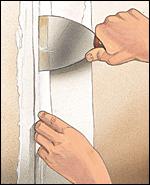 |
Fold a strip of paper wallboard tape in half, creating a crease by pulling the strip between your thumb and forefinger. Then position the end of the folded tape strip at the top of the corner joint. Press the tape into the wet compound first down one side of the corner joint, then the other, carefully checking to make certain the creased portion of the tape aligns with the corner of the joint. Then smooth both sides of the corner. |
|
|
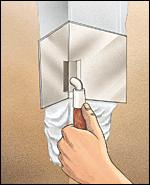 |
Apply a second coat of wallboard compound with a corner trowel. After the second coat dries, apply a final coat of compound and smooth it with a wet sander. |